
Review: RCOTI - Affordable Rear Projection Thermal Fusion
- Nick Chen
- Aug 15, 2025
- 8 min read
Updated: Aug 27, 2025

Thank you for joining us again for more esoteric night vision related content. Last week we took a close look at the RIX Tactical RENV-C. Today we take a look at an amazing new option for clip-on thermal imagers (COTI). The RCOTI is a COTI that does not project the thermal image through the night vision device. Instead it is projected behind your eyepiece! Lets take a closer look at it and see if it is any good.
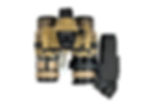
RCOTI (Rear Clip On Thermal Imager)
Having dual spectrum night vision goggles is a huge advantage. However to achieve thermal fusion (thermal image overlayed on a night vision image) is not easily achieved unless you accept certain compromises.
When you think of Thermal Fusion you think of the military systems like the ENVG system. These have integrated thermal sensors and displays to project the thermal image behind the image intensifier. The benefit to rear projection thermal fusion is you can have two distinct colors making it easier for the eyes and brain to diffrentiate the two images. With thermal fusion systems like the ENVG or PSQ-20 series, you can actually turn on the thermal and use it without turning on the night vision. However true thermal fusion systems are extremely proprietary, heavy and expensive. An ENVG binocular costs around $40k USD. A fusion monocular device can be purchased from $7,000 to $14,000 depending on the tube inside.
Most night vision enthusiasts then go with a COTI like the Safran OPTICS1 devices. They are more affordable in contrast to the thermal fusion systems. You can get an ECOTI for $4,500 USD in the second hand market or get a full priced one for $8,100. OPTICS1 offers a more simplified version called the TAD for $6,500. There are other more affordable options but all of the COTI systems project their thermal image using a fiber optic projector. You have to turn on your night vision device to see the thermal image. While companies like OPTICS1 have stand alone eyepiece adapters, those don't work well and are not meant for helmet mounted use. The constant stream of the thermal image into the input side of your image intensifier could potentially lead to thermal images burning into your tube. This is only a problem if you expose the tube to the same image for an extended period of time. If you move around it is not an issue.
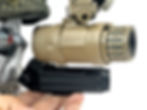
What sets the RCOTI apart from its contemporaries is the fact that it does not use a fiber optic projector but a thin waveguide lens to display the thermal image behind the eyepiece of your night vision goggle. See the large circular glass window below? That is the waveguide.

The RCOTI is larger than other COTI devices and heavier at 5.7 ounces with the mount.

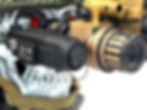
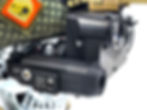
The RCOTI comes with a 3D printed cover for the waveguide lens with basic instructions printed on a sticker. In the photo below, the set screw for the windage adjustment was backing out.

Tethered to the waveguide cover is a rubber plug that covers the obejctive lens of the RCOTI.
The RCOTI is mounted to the eyepiece lock ring of your night vision device. It was designed around the milspec lock ring and eyepiece so non standard eyepieces might not work. For my L3 PVS-31A, I had to use the spacer I use for my GREC POV recorder.

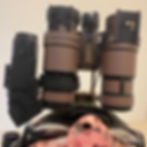
The RCOTI mount is a simple thin metal hoop. It is held in place with a thumb screw to clamp it onto your eyepiece. The RCOTI slides onto the mount and there is a spring loaded catch. See the small plunger near the top in the photo below? Press that to unlock the mount and you can remove the RCOTI.

Below is how the RCOTI is mounted on a milspec eyepiece. The waveguide is almost touching the eyepiece.

Using the RCOTI
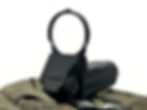
Due to the design of the RCOTI it is meant to be used on the right side monocular of a bino NVG. You can see the controls below. There are two dials to adjust the position of the thermal image so you can collimate it with your night vision image. Be careful, if you adjust it too far the position can get stuck.

Just in front of the windage adjustment knob is a 00B LEMO port. I believe this is how they program the RCOTI. I was told they are working on a battery pack for the RCOTI. The RCOTI is powered by rechargeable CR123. And has a run time of a couple hours. This sample did not come with any instructions or a manual.
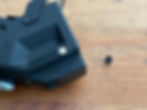
Underneath the set screw, opposite of the windage adjustment knob, is a self contained pogo pin. If you move the adjustment knob to far in, it can push the pogo pin back into itself and get stuck. Luckily I was able to pull it back out. I think they could have used a simple spring for this and not have this potential issue.
When the RCOTI is worn the power and control dial is on the bottom as well as the battery compartment door. The control dial is a spring loaded toggle that can flip forwards and backwards, it will return to center as soon as you let go. You can also push up on the toggle and that will perform a non-uniformity calibration.

Moving the toggle forwards or backwards cycles through the different color palettes. Rainbow, black hot, white hot, outline and highlight. Outline and highlight modes are orange which provides great color contrast to green or white phosphor.
If you look at the image below you can see the angled protrusion at the rear of the RCOTI housing. Unfortunately this is what limits the positions you can mount the RCOTI. You can mount the RCOTI at 3 or 9 o'clock but the on-screen display cannot be rotated so the words and compass will be upside down if you have it on the left hand side.

The protrustion actually wraps around your head.
If you mount the RCOTI at 6 o'clock, the protrusion can touch your cheek bone. It does not
feel good having a chisel like point pressing against your face.

Since the RCOTI is mounted on the eyepiece you can mount another device like an ECOSI and have a triple spectrum device that can see LWIR., SWIR and NIR. At the time of this review, my ECOSI was loaned out to B.E. Meyers. But you can see a similar setup below.

Since the RCOTI design reaches around a housing, I was able to mount it to my Thales LUCIE.

It would be better if I had a mount that was lower profile to get the waveguide right up against the LUCIE eyepiece.

Pano Fusion

I had hoped I could use the RCOTI with a set of panos but due to the design, specifically the chisel like rear protrusion, this is not really possible. For the photos above and below, I was able to adjust the IPD of the pods to their max width and wedge the RCOTI in between them. However now the pods are not aligned to my pupillary distance, making this setup borderline useless.

I was able to hold the RCOTI underneath the right pod but had same problem as mentioned earlier. The rear protrusion hits my cheek bone.


We have PSQ-20 At Home

I was able to mount a PVS-14 to my custom PSQ-20 bridge but due to the limitations of the PVS-14, I had to switch the PSQ-20 to the left side and mount the RCOTI and PVS-14 on the right hand side. Now both eyes have thermal fusion.
What If I have a PVS-14?
Well dear reader you will have a difficult time using the RCOTI, but it can be done. Take a look at the photo below. This is a PVS-14 with an AX-14 style arm. These types of arms position the battery compartment on the right hand side if you are right eye dominant. With a PVS-14 mounted like this, there is no way to mount the RCOTI. While you could try and mount it at 12 o'clock, the rear protrusion would hit your brow and due to the thickness of the RCOTI, It wouldnt fit under the brim of your helmet.

If you get a Rayvn Rail bridge or similar arm/bridge that positioned the battery housing at 6 o'clock then it is possible to mount the RCOTI.


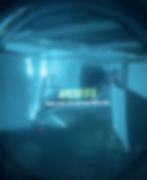
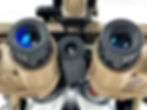
Looking Through The RCOTI

Look at the image above. The RCOTI has a small FOV compared to other COTI devices. The OPTICS1 ECOTI has a 30º FOV while the RENV-C has a staggering 35º FOV. You can see how much smaller the RCOTI is in comparison.
I don't have a working COTI to directly compare so I took a previous COTI photo and scaled it to match the RCOTI image. The night vision images are slighjtly offset but trust me, I scaled them to each other and then shifted the COTI 20º FOV blue circle over the RCOTI yellow rectangular image. I would say the RCOTI is close to 20º FOV if you base it on the diagonal length.

You can see the little test I did comparing the RENV-C and ECOTI to the RCOTI. The RCOTI performed better than the RENV-C with regards to the algorithm they use to display outline and highlight modes. The RENV-C has a lot of false positives while the ECOTI is still the best for detecting people.
Final Thoughts On The RCOTI
I saw a preproduction sample of the RCOTI last November at East Coast Night Shoot. I told the person there, this is ready to go now even though it could use some refinement the price point and performance made this very attractive. The RCOTI retails for just $1,600. It is a 384 resolution thermal sensor and while the refresh rate is a bit low I don't find that to be a deal breaker. It is an entry level COTI system but the advantages far outweigh the disadvantages. The rear projection is perfect. You no longer need to turn on your NODS just to use the COTI.
The thin metal band that holds the waveguide makes me nervous and I am paranoid about bending or breaking it. However if it is mounted to your goggle,. the likelihood of damage to the wave guide from dropping the goggles is a low percentage. More than likely you will damage your tubes or goggle before damaging the waveguide.
There are rumors that Nite Optics, the manufacturer of the RCOTI, is working on a higher resolution version with larger FOV. However I do not know the specs or projected price point. I would like to see an update on this current version RCOTI to at least be able to rotate the onscreen display so the text and compass will be right side up for users that want to mount the RCOTI for their left eye.
The RCR123 takes up a lot of space in the RCOTI housing. I think if they removed the battery compartment entirely they could save some weight and just use a battery pack and cable to power the RCOTI. They just need a 90º plug to limit the cable as a snag hazard. I also would like to see more mounts made available like for the PVS-31A and a larger adjustable mount for third party diopters that are larger in diameter than the milspec eyepiece.
Thanks to RCOTI USA and Theia Systems for sending this unit in for review.