
Review: RIX Tactical RENV-C Clip-On Thermal Imager
- Nick Chen
- Aug 8, 2025
- 7 min read
Welcome back to another installment of Night Chenanigans. Its been a minute so we will get right into it. RIX Tactical lent me their RENV-C for this review. This is the latest clip-on thermal imager (COTI) by RIX Tactical and I am eager to see how it performs.

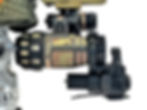
RIX Tactical RENV-C Thermal Clip-On
The RENV-C is a thermal clip on for night vision goggles. It is a 640x512 thermal imager. Like other COTI systems, it projects the image using a fiber optic projector that displays the thermal image through the objective lens of your night vision goggle. The RENV-C is rumored to be the successor to the Jerry-C by InfiRay. In fact the InfiRay Jerry C Pro is nearly identical to the RENV-C. That being said lets take a closer look at the RENV-C.
The RENV-C has three buttons, one on the right hand side for power and two on the right hand side for mode swapping and brightness control.

Press and hold the Power button to turn the RENV-C on and off. While the RENV-C is turned on, pressing the Power button will perform a manual NUC. In the unit's menu, you can change this functionality between correction, breathing, auto brightness, dormancy.
Breathing is a function that will pulse the thermal image on and off. This is to allow you to see without thermal image for better positive identification with night vision but without having to turn off the RENV-C and back on again. This will also reduce the chances of burning the thermal image into your image intensifier.

At first I thought the RENV-C only has highlight and outline mode. Highlight is like the Patrol mode in the other COTI systems like Optics1 and InfiRay. I did not see a full thermal mode. However if you read the manual, holding down the +/- button will switch from brightness to threshold. Brightness is shown on the right handside of the screen with a curved bar going upwards and a sun icon at the bottom. Threhold is an icon of a 3 dimensional cube. Pressing the +/- sign will change the brightness or threshold. As you tap the button, the brightness or threshold will increase. Once you reach the max, pressing the button again will drop the brightness or threshold back to the lowest setting. Keep pressing to raise them back up. Brightness is self explanatory, while threshold is how much thermal image you see. Keep it low and only the hotter objects in your field of view will light up. Turn threshold all the way up and you will get a full thermal image.
As mentioned above, holding down the "M" button opens the settings menu for the RENV-C.

There are two features that are nice additions to the RENV-C that I do not see in other COTI systems. The Auto Standby and Flip-Up/Shut Down settings are great. While I do not really use the Auto Standby feature it is nice to have in case you forget to turn off the RENV-C but it is the Flip Up setting that I really enjoy. Some night vision goggles do not shut off when you flip the goggle up on your helmet. My L3 PVS-31A technically have an internal sensor that will shut power to the goggle when flipped up, however if you bend down or look down, the goggle will turn back on. So having the RENV-C shut off when they sense their orientation is passed vertical is a great setting. This prevents burn-in of my image intensifier and saves battery life.
With regards to Auto-Brightness, I never understood why COTI devices have light sensors. Thermal imagers do not need or see light. Why would I want the device to dim itself? I can manually adjust the image brightness using the +/- button. The menu also mentions GNSS for GPS however that is only used when combined with the GPS enabled battery pack.

The RENV-C lens cover is a rubber cap that has a molded tether. Flip the cover off the objective lens and it hangs below the device. Pull the tether back and it will slide through the integrated loop on the COTI housing. See the protrusions on either side of the tether: Those act as a stop. Pull the tether so the protrusions go past the housing loop and they will keep the lens cover in place until you pull it back forward.

The RENV-C comes with a mount that clamps onto the infinte focus stop ring just behind your night vision goggle's objective lens.
If you have an InfiRay Jerry 31 or RIX Tactical RNV-31, they have integrated COTI mounts that bolt onto the bottom of the monocular pods.


When i tried to mount the RENV-C to my Jerry-31, there is a small rubber shim and it was too thick to allow the RENV-C to slide over it. So I removed the rubber shim and now I can mount the RENV-C.

How Small Is The RENV-C?
The RIX Tactical COTI is smaller than the Optics1 ECOTI. While I do not have the Optics1 TAD at the time of this review, comparing photos of the TAD to the ECOTI, the RENV-C is a little bit shorter than the TAD. Weight wise they are the same at just 2.8 oz with CR123.


As mentioned earlier, there is a remote battery pack that will power the RENV-C. I do not have one for this review but unlike other COTI systems that have a battery port on the housing, the RENV-C does not. Instead you remove the battery tube and screw on the power cable. With the battery pack plugged in, you now have a GPS antennae to help display your location as well as a 12 hour run time. The battery pack is powered by two 18650 li-ion rechargeable batteries.


Looking Through The RENV-C

The RENV-C has a large FOV. RIX Tactical says it is 35º instead of the 30º like in the Optics1 ECOTI. In the photo above you can see the RCOTI is a much smaller FOV in the yellow box while the blue circle is the RENV-C.
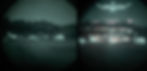
One thing I noticed with the RENV-C is that it shows a lot of false positives compared to the ECOTI and RCOTI. Look at the screen shots above. The RENV-C shows a lot of superflous thermal outlines like the trees, ground and canopies even though there are people in its FOV. The RCOTI has less false positives and the ECOTI has the least. The ECOTI algorithm prioritizes people over anything else and usually the false positives go away when a person is in the FOV of the thermal sensor. Take a look at the video below. I film through my PVS-31A and show the RENV-C and then the ECOTI. The RCOTI is mounted to the same pod as the RENV-C so you can see both at the same time.
Final Thoughts On The RENV-C
The RENV-C has some things that I do not like. First it only uses a CR123 with a run time of 3 hours. RIX Tactical offers a battery pack that is powered by twin 18650. The second issue. is that you cannot use rechargable batteries unless you get their battery pack. The Jerry-C COTI was great because it can use rechargeable CR123 but it also has a longer battery tube to use an 18650 for an 8 hour run time. I dont understand why they did away with that option. I dont know if the RENV-C will allow you to use a rechargeable CR123. I dont want to try and risk burning it out. RIX Tactical claims their battery pack will power the RENV-C for 12 hours however the manual for the RENV-C says it is only 10 hours.
RIX Tactical offers a 1 to 2 cable that will power their RNV-31S NVG bino as well as the RENV-C. According to RIX Tactical's website the 1 to 2 cable has a 4 pin Fischer connector at both ends so it will also work with PVS-31 (I assume they mean the L3 version) as well as GPNVG. They also claim that this cable is also compatible with other 4 pin fischer battery packs. I ordered the cable just before publishing this article and will update it when I get it. In theory I should be able to power the RENV-C with my L3 battery packs.
The RENV-C has fewer features than the Jerry-C besides battery compatibility. The Jerry-C is able to rotate the onscreen menu and flip the thermal image for use with the stand alone eyepiece. However the RENV-C does not have this option. There are times I do ot want my COTI at 6 o'clock position. Like if I am using my GREC POV recorder, the housing of the recorder gets in the way of the COTI including the RENV-C. While the eyepiece adater is not very good, its like trying to look through a soda straw with the eye relief oc a contact lens, it is still a feature missing from the RENV-C.
The biggest issue I have is the false positives. I have played with the settings and unfortunately I have not been able to eliminate the false positives. At $4,169 the RENV-C is technically cheaper than the Optics1 offerings, $8,500 for ECOTI and $6,500 for TAD,. However you can get the InfiRay Jerry C Pro for less around $3,705 from various online retailers. On the second hand market, Optics1 ECOTI can be seen listed for jsut $4,500 and while that is more than the RENV-C at full retail, I think the Optics1 ECOTI is a better COTI.
The compass and GNSS are displayed all the time and while you can turn them off, it can potentially burn them into your image intensifier. Especially the graphic line just below the compass. It never changes. You can change the compass to jsut display a number and that will reduce the chances of tube-burn.
The RENV-C has a very slow boot up time. I timed it and from the moment I press and hold the power button, it takes almost 10 seconds for the thermal image to show up.
Incuded with the RENV-C is a bluetooth remote. Which mirrors all the functions of the unit. However running Bluetooth will use up more battery and reduce run time. Also, according to a friend in the military, Bluetooth is not that desirable since it is easy to detect a Bluetooth signal and triangualte its location. Thankfully you can turn the Bluetooth off. I do wish RIX Tactical had a way to mount the remote on a picatinny rail. That way you can have the remote on your weapon and you can manipulate the RENV-C without having to reach up and touch the device.
I do like the large 35º FOV. It is the largest of any COTI that I have seen. The price is a bit hard to swallow when there are other options out there. You can find a used Jerry C5 for under $3,000. The new RCOTI, while lower resolution at just 384 and smaller FOV is rear projection and retails for just $1,600. So there are options out there. Figure out what your priorities are and maybe the RENV-C ticks all your boxes.